Home Lab 10 - Minimalist Container host with Autoscale and Gitops - GitOps Mechanism
You should have an Alpine Linux host running Docker. If you don't then head back to the first blog to get that setup. Ontop of this you should have Portainer, Traefik and Sablier installed. If you don't then head back to the last blog to get that setup. Today we'll polish off our environment, at least in terms of functionality, with addition of the Gitops mechanism.
Application stacks
How you configure this is really entirely up to you, I'll show you how I've set it up and you can copy that if you wish. I do suggest reading the documentation to verify my settings.
Postgresql
We'll be needing a postgres database for Gitea. Gitea can use a built-in DB if you wish but this is a more robust/scalable setup. Here is the stack file:
version: '3.1'
# Database sits only in data_tier
# which should only be accessible from app_tier
networks:
  data_tier:
     external: true

services:
  postgres:
    image: postgres:15-alpine
    container_name: postgres
    restart: always
    environment:
      # Create secret values `postgres_user` and `postgres_password`
      # to have these variables swapped out
      POSTGRES_USER: $POSTGRES_USER
      POSTGRES_PASSWORD: $POSTGRES_PASSWORD
    networks:
      - data_tier
    volumes:
      - postgres:/var/lib/postgresql/data
    # Don't allow Traefik to route to here
    # We want to rely only on built-in internal
    # networking of Docker
    labels:
      - traefik.enable=false
volumes:
  postgres:
    external: false
Go ahead and create this stack in Portainer.
Configuration
You can lock this down as much as you wish, but these instructions will get you running.
# Login to the postgresql container
doas docker exec -it postgres /bin/sh
# `psql` into the database
$ psql -u $POSTGRES_USER
# Create a user for Gitea
> create user gitea with encrypted password 'DEADBEEF';
# Allow access to public schema
> grant all on schema public to gitea;
# Create database and give owner to gitea
> create database gitea with owner gitea;
Gitea
Here is the stack yaml file:
version: "3.1"
# Gitea must access postgres so it needs both app tier and data tier
networks:
  app_tier:
     external: true
  data_tier:
     external: true

services:
  gitea:
    image: gitea/gitea:1.18.3
    container_name: gitea
    restart: always
    networks:
      - app_tier
      - data_tier
    environment:
      - USER_UID=1000
      - USER_GID=1000
      - GITEA__database__DB_TYPE=postgres
      - GITEA__database__HOST=postgres:5432
      - GITEA__database__NAME=gitea
      - GITEA__database__USER=gitea
      # Create secret 'gitea__database__pass' with the password
      # you set in your user creation
      - GITEA__database__PASS=$GITEA__database__PASS
      - GITEA__webhook__ALLOWED_HOST_LIST=*.salmon.sec
      - GITEA__webhook__SKIP_TLS_VERIFY=true
    ports:
      - 3000 # HTTP
      - 2222 # SSH
    volumes:
      - data:/data
volumes:
  data:
    external: false
You can launch this stack now, but won't be able to access the installation until we reconfigure traefik.
Woodpecker
Now let's add our CI software! Here is the stack:
# docker-compose.yml
version: '3.1'
networks:
  app_tier:
    external: true
  data_tier:
    external: true
services:
  server:
    image: woodpeckerci/woodpecker-server:next-alpine
    ports:
      - 8000
      - 9000
    container_name: woodpecker-server
    volumes:
      - data:/var/lib/woodpecker/
    environment:
      - WOODPECKER_OPEN=true
      - WOODPECKER_HOST=https://woodpecker.salmon.sec
      - WOODPECKER_ADMIN=admin
      - WOODPECKER_REPO_OWNERS=admin
      - WOODPECKER_GITEA=true
      - WOODPECKER_GITEA_URL=https://git.salmon.sec
      - WOODPECKER_GITEA_CLIENT=${WOODPECKER_GITEA_CLIENT}
      - WOODPECKER_GITEA_SECRET=${WOODPECKER_GITEA_SECRET}
      - WOODPECKER_GITEA_SKIP_VERIFY=true
      - WOODPECKER_DATABASE_DATASOURCE=${WOODPECKER_DATABASE_DATASOURCE}
      - WOODPECKER_DATABASE_DRIVER=postgres
      - WOODPECKER_AGENT_SECRET=${WOODPECKER_AGENT_SECRET}
    networks:
      - app_tier
      - data_tier
  agent:
    image: woodpeckerci/woodpecker-agent:next-alpine
    command: agent
    restart: always
    depends_on:
      - server
    container_name: woodpecker-agent
    volumes:
      - /var/run/docker.sock:/var/run/docker.sock
    environment:
      - WOODPECKER_SERVER=woodpecker-server:9000
      - WOODPECKER_AGENT_SECRET=${WOODPECKER_AGENT_SECRET}
      - WOODPECKER_MAX_PROCS=4
      - WOODPECKER_LOG_LEVEL=trace
    networks:
      - app_tier
    labels:
      - traefik.enable=false
volumes:
  data:
    external: false
I suggest you take a look at woodpecker installation docs for details on what to change here for your environment.
Reconfigure Traefik
The last thing we need is to reconfigure Traefik to route to the new services we've created.
In your dynamic.yml for Traefik add the following:
...
http:
  # New middleware for Gitea/Woodpecker
  middlewares:
    sablier-gitea:
      plugin:
        sablier:
          dynamic:
            displayName: The Git Bash (っ^‿^)っ
            refreshFrequency: 10s
            showDetails: "true"
            theme: ghost
          names: gitea
          sablierUrl: http://sablier:10000
          sessionDuration: 1h
    sablier-gitea-ssh:
      plugin:
        sablier:
          blocking:
            default-timeout: 2m
          names: gitea
          sablierUrl: http://sablier:10000
          sessionDuration: 1h
    sablier-woodpecker:
      plugin:
        sablier:
          dynamic:
            displayName: The CICD Bird
            refreshFrequency: 10s
            showDetails: "true"
            theme: ghost
          names: woodpecker-server, woodpecker-agent
          sablierUrl: http://sablier:10000
          sessionDuration: 1h
    # Proto/host forwarding for Woodpecker
    woodpecker-headers:
      headers:
        customRequestHeaders:
          X-Forwarded-Proto: https
          X-Forwarded-For: woodpecker.salmon.sec
  # New Routers
  routers:
    gitea_http:
      service: gitea_http_svc
      rule: "Host(`git.salmon.sec`)"
      tls: false
      entrypoints:
        - websecure
      middlewares:
      - "sablier-gitea"
    gitea_ssh:
      service: gitea_ssh_svc
      rule: "Host(`git.salmon.sec`)"
      entrypoints:
        - ssh
      middlewares:
      - "sablier-gitea-ssh"
    woodpecker_http:
      service: woodpecker_http_svc
      rule: "Host(`woodpecker.salmon.sec`)"
      tls: false
      entrypoints:
        - websecure
      middlewares:
      - "woodpecker-headers"
      - "sablier-woodpecker"
  # New Services
  services:
    gitea_http_svc:
      loadbalancer:
        servers:
        - url: http://gitea:3000
    gitea_ssh_svc:
      loadbalancer:
        servers:
        - url: http://gitea:2222
    woodpecker_http_svc:
      loadbalancer:
        servers:
        - url: http://woodpecker-server:8000
Write that file, traefik will hot-reload and you'll now be able to reach your services!
GitOps
With these services installed, head into Gitea and create yourself an account and push the local repo you've been using for all these stack files up there. We'll be using this repo to execute CI jobs to update the stacks.
For our example, we'll use CI to update itself! We'll use a webhook on the Woodpecker stack to update it from Woodpecker.
As your environment grows you would want to add additional jobs here for each stack you want to keep up to date on each change in Git.
In your repo, create a Woodpecker CI file .woodpecker.yml:
clone:
  git:
    image: woodpeckerci/plugin-git
    settings:
      skip_verify: true # Allow us to quickly clone from our internal git repo
pipeline:
  woodpecker:
    image: curlimages/curl:latest
    commands:
      - curl --insecure --retry 5 --retry-delay 30  --retry-max-time 360 -v -X POST $WOODPECKER_STACK_WEBHOOK
    secrets: [ woodpecker_stack_webhook ]
    when:
      path: woodpecker/docker-compose.yml
Before this will work, we need to use the web UI's to do some configuration
Webhook URL
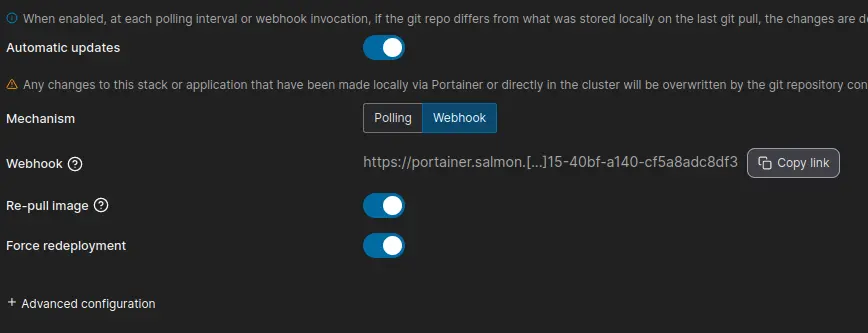
Load up portainer, go into the Woodpecker stack we created and enable 'automation' then capture the Webhook URL.
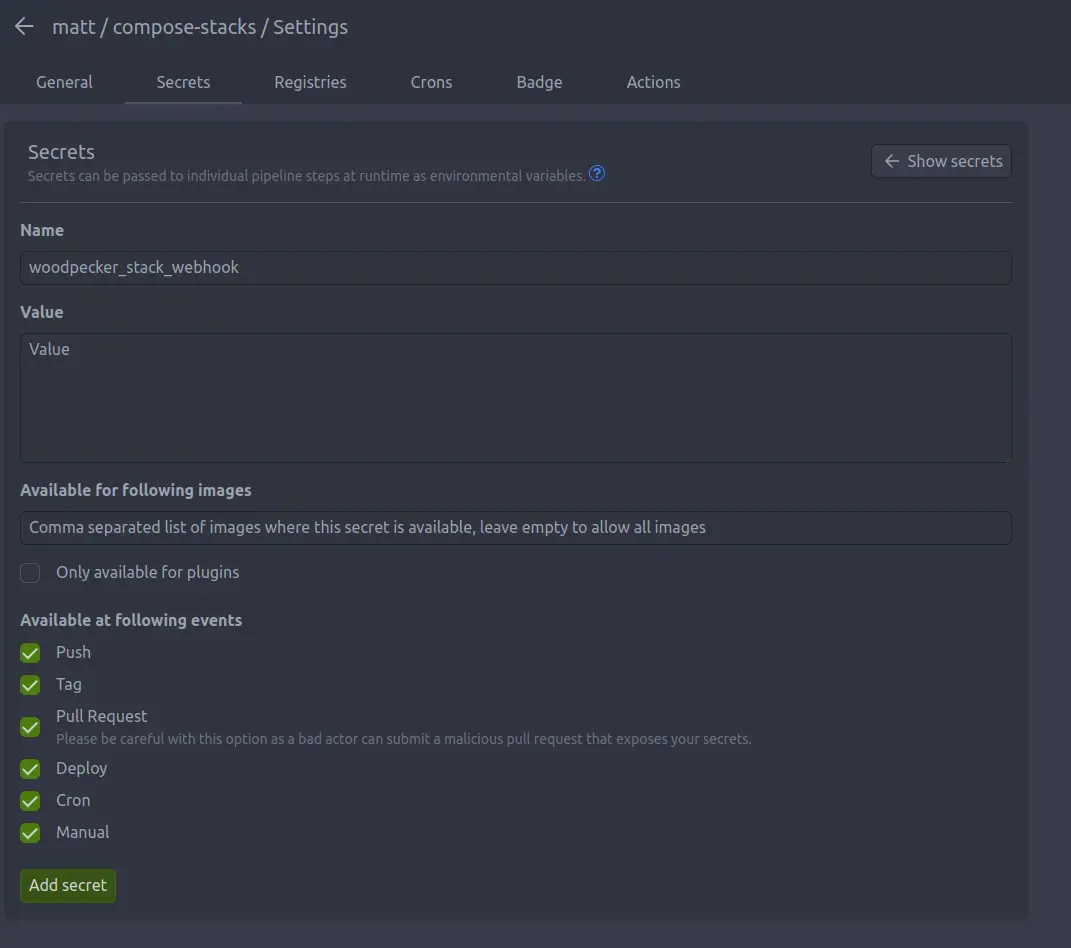
Load the woodpecker UI, enable the stack repo you created and create a secret for the woodpecker_stack_webhook.
Now when you push a change to the woodpecker/docker-compose.yml file it will automatically update from Git!
Conclusion
Now we've created a wonderful lightweight container environment that efficiently uses our hardware and is easily updated through us just interacting with Git. This gives us an awesome base system to really tightly lock down, we'll get into that in future blogs of this series!