Revisions
Recently I've had to pack up my computer as I'm relocating. It's going to be packed up for about a month. To do this, I had to drain the rig out. This gives me some time to think about improvements I can make before putting it all back together. I have a few things I want to do...
CPU Loop
The CPU Block has some gunk on it already, likely from using the Cryofuel solid premix solution. Even the tubing has a white residue built up on the lower surfaces. So, I have to dismantle the block and clean it. While looking up how to do this I noticed that I can actually rotate the block so my CPU runs aren't vertically stacked but proper horizontal runs. This is going to be a lot easier to implement, making the build look much cleaner! I'll also use two right-angle fittings to reduce the number of bends required. Required Work & Parts:
- 2 pieces of tubing
- 2x 90degree fittings
- Disassemble the CPU block
- Clean with toothbrush & distilled water + dish soap
- Re-assemble rotated 90 degrees
- 2*90degree bends in each piece of tube
- reassemble loop
GPU Loop
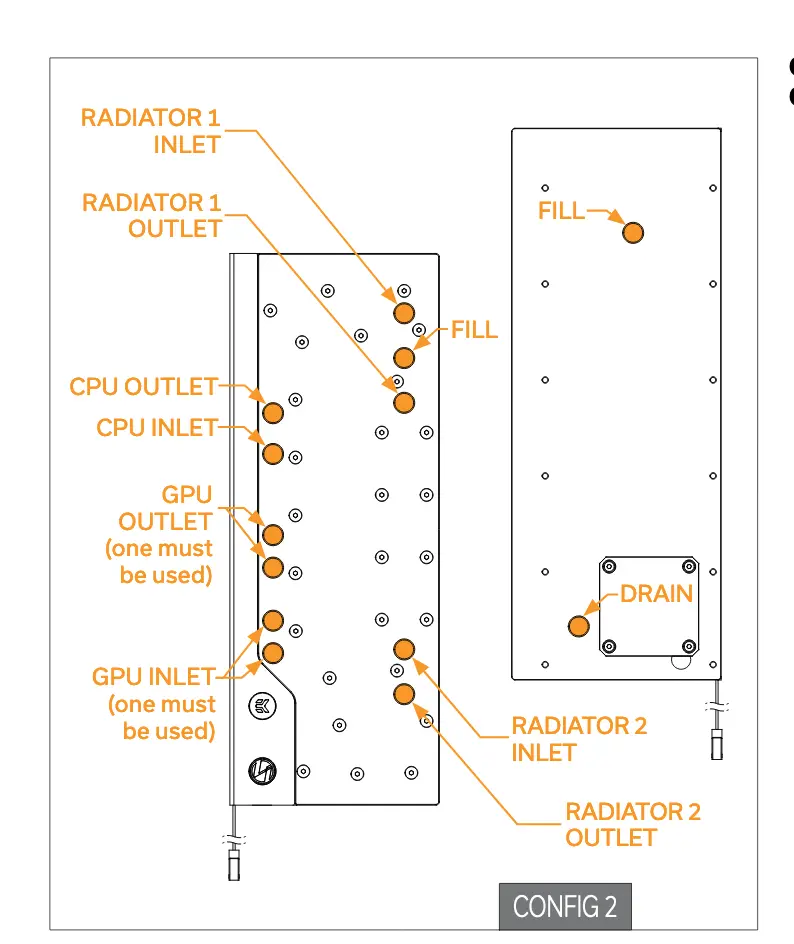
I hate how difficult it is to see the GPU Cold Plate, so I'm going to vertically mount it. I'll pickup a vertical GPU mount bracket and re-do the GPU runs as well. Having a look at how it'll come together, I need a refresher on how the distro-plate is intended to be configured:
 And then a peek at how to vertical GPU mount looks:
 It's hard to say until I get everything in the case to see what it looks like, but I think it'll take a 90 degree bend at both ports of the GPU block, and then a 90 degree bend in a different direction to get into the block. Having tried this before, I'm going to pickup a few 90-degree fittings to attach to the GPU block so each bend should only need one 90-degree bend in one direction.
- Vertical GPU Mount Bracket
- 2x 90-degree fittings
- 2x tubing
2nd Radiator
I had planned at the start to add another radiator, and I think this is a great time to do it. My GPU temperatures have been insane, at full load it barely pushes 5 degrees over ambient. However, the CPU loop is preforming worse than I had expected with idle temps about 15-20 degrees above ambient and at load pushing 35-45 above ambient. The CPU Loop is after the GPU loop so it's understandable that it would preform a little worse. The first radiator I bought is really too large for the system - it just barely squeezes in with a lot of force and there's quite a lot of torque on the poor screws. I won't make that mistake twice! The Diagram for the GPU mount states that we have 63mm of room at the bottom to work with, 25mm of which are taken up by the Ek-Vardar Fans, lets shave off 3mm to have a small gap leaving just 35mm for a radiator. The bends for the radiator loop are very simple, just two simple 90-degree bends. I'll also need two more fittings for it.
- 35mm height, 360mm length radiator (Nickle Fins)
- 3x Ek Vardar Fans
- 2 pieces of tubing
- 2 fittings
Accidental Mixed Metals
I accidentally mixed metals in my loop as well... The GPU/CPU plates at Nickle Plated Copper, and my Rad is Aluminium. This means I actually need to replace the existing Rad with Nickle or Copper fins.
RGB Tune-up
The RGB in the rig is overall working fine but control is pretty disjointed, and I want to add RGB shrouds to all 6x of the Ek-Vardar Fans, meaning we're about to have a lot more RGB lines to control, more than is supported on my motherboard directly. I also want to add a single case-fan at the rear to complete the cooling system for the machine, adding another RGB line of some sort. Let's take Stock of the component's RGB Connector types:
4-Pin [+12v, G, R, B]
- 6x Phanteks Halos (18 LED) [Need adapter phantek -> 4pin RGB, chained together for 1 port used]
- Heatkiller IV GPU Block ()
3-Pin [+5v, D, -, Gnd]
- EKWB EK-Velocity CPU Waterblock
- EK-Classic Side Distro Plate My motherboard has:
- 2x ARGB (75 LED each)
- 1x 12V RGB (3 Amp)
Connecting
My Motherboard only has one 12V RGB port, so I'll need to get some sort of adapter. I'm going to assume the Fan Shroud uses the standard SMD5050 LED Chip, which uses about 0.24W of Power or 0.02A at 12Volts. Thus, each shroud will require somewhere around 0.36A for a total of 2.16A. I cannot find specs on the LED strip on the GPU block anywhere but surely we've got enough current remaining. We have two ARGB ports and two ARGB devices, so we don't need any adapters there. But, we'll need an adapter for the 12V RGB.
- 6x RGB Fan shrouds
- 1x RGB Case-Fan
- 1x 1-7+ 12V RGB Splitter
Filling & Draining
Jumping the power supply is a huge pain at the moment for filling the rig, so I'm going to pickup an old ATX Power supply to use to power the pump externally. I also need to add a proper drain port setup. Adding another Rad at the bottom means the lowest point in the loop is no longer the drain port on the distro plate. What I think I'll do is grab a T-Joint Flow meter and use the extra end to attach a valve onto. Then, Connect that in-line with the bottom rad and tip the rig down to drain.
- 2* 90 degree fittings
- Drain valve
- Random ATX PSU
- Drill & Bits
Bill of Materials
- Bitspower Valve
- T-Joint Flow Meter
- 4* 90 degree fitting
- 3* EK Vardar Fans
- 6* RGB Fan shrouds
- 4* Hard Tube
- 4* G1/4 Fittings
- Thin Rad for Bottom
- Thicker rad for top
- Vertical GPU Bracket
- Heat Gun
- Drills
- Clear Coolant concentrate
- This for fun