Perfect OpSEC - Become Invisible Online
This series is for educational purposes only. To get back to top-level table click here.
Intro
The start of everything, is your workstation OS. You can do all kinds of research for what the best option here is, but the truth is it does not overly matter. As long as you've taken the correct encryption steps and keep everything sensitive off your main OS HDD/SSD you've done the best you can. You'll end up securing your host OS properly - and either running Whonix from a VM or Tails from a USB. Our goal is to limit breadcrumbs being left around, so:
- Never connect to Tor from your Windows/Mac/Whatever Host
- Do everything else within a VM
- Store everything sensitive or even vaguely related to your VM activities off your main HDD/SDD.
- Passwords/Accounts/Notes/Code/Pictures/EVERYTHING Remember: This machine should be adherent to the guidelines in the hardware section.
- Purchased with Cash
- NOTHING personal accessed on this machine
- Never connect any personal device to the same network as this machine
Hardening the Base OS
Never use your host machine to connect directly to anything sensitive. This section is going to go through steps you should take to harden that host machine regardless of what you choose. Windows and MacOS frequently send out all sort of marketing information on you, because that's the world we live in. If you're doing something sensitive and your base OS is reaching out to icloud constantly, it'll be trivial to track you down. So seriously, consider using Linux.
Linux
Because it's what I recommend, I have a separate section on hardening Linux
Windows
Windows users are the most common targets of snoopers because it's the most popular OS, and most people have default settings. Windows has a huge attack surface, too. If you're still dead set on Windows:
- Use a VPN from base OS always
- Bitlocker encrypt the HD
- use encrypted USB's for all sensitive info
- Always keep the damn thing updated
- Change MAC each boot
- Disable Bluetooth
- setup BIOS password, disable USB startup if you can
- Turn on Windows Firewall
- Install CCleaner and use it before each shutdown
- Install AV & Keep Windows Def up to date
- Use GlassWire to control all network I/O
MacOS
MacOS is relatively easy for the average user to harden, secure, and lock down. With the latest macOS update "Big Sur" makes it the securest release yet and is fairly difficult to compromise with malware. If you're insisting on using macOS as your main OS then you need to encrypt your HD with FireVault, use encrypted USBs for all your "dark" related files and VMs, with ideally having a VPN installed.
- Encrypt with FireVault
- Encrypted USB's for all sensitive info
- Disable bluetooth
- Change MAC each boot up
- Install CCleaner, use it before each shutdown
- BIOS password & disable USB boot if possible
- Turn off all sharing
- Turn on firewall
- Install AV
- Use LittleSnitch or LuLu to control network I/O Disable bash history, In Terminal.app type:
unset HISTFILE; unset SAVEFILE
rm ~/.bash_history
ln -s /dev/null ~/.bash_history
export HISTFILE=/dev/null
export SAVEFILE=/dev/null
rm ~/.zsh_history
ln -s /dev/null ~/.zsh_history
It's also a good idea to clear your logs in /var/logs. You'll need to type "sudo -i" first to become root in order to clear them. In particular /var/log/wifi.log as this log file would reveal if this user was on a specific network at the time of a compromise or hack. It's a good idea to invest a little time going through these.
You want to control everything outgoing/incoming to your machine and the free applications listed below is a great place to start in having control of your macOS.
Knock Knock
LuLu (Alternative to LittleSnitch)
Do Not disturb
Block Block
https://objective-see.com/products.html
We can prevent iCloud snitching on us by editing the /etc/hosts file.
By replacing your "/etc/hosts" file with items below in orange we will redirect all the domains listed in the "/etc/hosts" file to 127.0.0.1 (localhost). This way no connection is made from your computer to any Apple server.
You can also do this in Windows by editing the "C:\Windows\System32\Drivers\etc\hosts" file.
WARNING
Replacing your "/etc/hosts" or "C:\Windows\System32\Drivers\etc\hosts" file will prevent your OS from properly updating your computer. It's recommended to visit a random coffee shop and replace the modified hosts file with the backup of the original to update as required when needed. You should always keep your host OS up to date and install the latest security fixes.
Open up Terminal and type:
sudo cp /etc/hosts /etc/hosts-backup
sudo rm /etc/hosts
sudo touch /etc/hosts
sudo vim /etc/hosts
Hit the letter "i" on your keyboard so you can enter text with vim. Copy the text in orange below and paste it into Terminal with vim.
##
# Host Database
#
# localhost is used to configure the loopback interface
# when the system is booting. Do not change this entry.
##
127.0.0.1 localhost
255.255.255.255 broadcasthost
::1 localhost
127.0.0.1 init-p01md.apple.com
127.0.0.1 p34-fmfmobile.icloud.com
127.0.0.1 swcdn.apple.com
127.0.0.1 AssetCacheLocatorService.xpc
127.0.0.1 news.apple.com
127.0.0.1 kt-prod.apple.com
127.0.0.1 keyvalueservice.icloud.com
127.0.0.1 13-courier.push.apple.com
127.0.0.1 apple.news
127.0.0.1 pancake.apple.com
127.0.0.1 22-courier.push.apple.com
127.0.0.1 36-courier.push.apple.com
127.0.0.1 1-courier.push.apple.com
127.0.0.1 push.apple.com
127.0.0.1 32-courier.push.apple.com
127.0.0.1 4-courier.push.apple.com
127.0.0.1 32-courier.push.apple.com
127.0.0.1 3-courier.push.apple.com
127.0.0.1 42-courier.push.apple.com
127.0.0.1 2-courier.push.apple.com
127.0.0.1 gsp-ssl.ls.apple.com
127.0.0.1 37-courier.push.apple.com
127.0.0.1 updates-http.cdn-apple.com
127.0.0.1 27-courier.push.apple.com
127.0.0.1 valid.apple.com
127.0.0.1 19-courier.push.apple.com
127.0.0.1 9-courier.push.apple.com
127.0.0.1 api-glb-use2b.smoot.apple.com
127.0.0.1 6-courier.push.apple.com
127.0.0.1 14-courier.push.apple.com
127.0.0.1 8-courier.push.apple.com
127.0.0.1 7-courier.push.apple.com
127.0.0.1 48-courier.push.apple.com
127.0.0.1 50-courier.push.apple.com
127.0.0.1 17-courier.push.apple.com
127.0.0.1 11-courier.push.apple.com
127.0.0.1 35-courier.push.apple.com
127.0.0.1 34-courier.push.apple.com
127.0.0.1 47-courier.push.apple.com
127.0.0.1 28-courier.push.apple.com
127.0.0.1 43-courier.push.apple.com
127.0.0.1 40-courier.push.apple.com
127.0.0.1 20-courier.push.apple.com
127.0.0.1 21-courier.push.apple.com
127.0.0.1 38-courier.push.apple.com
127.0.0.1 15-courier.push.apple.com
127.0.0.1 23-courier.push.apple.com
127.0.0.1 33-courier.push.apple.com
127.0.0.1 41-courier.push.apple.com
127.0.0.2 32-courier.push.apple.com
127.0.0.1 26-courier.push.apple.com
127.0.0.1 12-courier.push.apple.com
127.0.0.1 30-courier.push.apple.com
127.0.0.1 46-courier.push.apple.com
127.0.0.1 44-courier.push.apple.com
127.0.0.1 29-courier.push.apple.com
127.0.0.1 gsp64-ssl.ls.apple.com
127.0.0.1 18-courier.push.apple.com
127.0.0.1 49-courier.push.apple.com
127.0.0.1 24-courier.push.apple.com
127.0.0.1 5-courier.push.apple.com
127.0.0.1 39-courier.push.apple.com
127.0.0.1 16-courier.push.apple.com
127.0.0.1 10-courier.push.apple.com
127.0.0.1 25-courier.push.apple.com
127.0.0.1 31-courier.push.apple.com
127.0.0.1 init.push.apple.com
127.0.0.1 45-courier.push.apple.com
127.0.0.1 p34-keyvalueservice.icloud.com
127.0.0.1 push.apple.com
127.0.0.1 iadsdk.apple.com
127.0.0.1 p34-availability.icloud.com
127.0.0.1 www.apple.com
127.0.0.1 configuration.ls.apple.com
127.0.0.1 p34-escrowproxy.icloud.com
127.0.0.1 api-glb-use2c.smoot.apple.com
127.0.0.1 api-glb-fra.smoot.apple.com
127.0.0.1 bag.itunes.apple.com
127.0.0.1 captive.apple.com
127.0.0.1 cl2.apple.com
127.0.0.1 setup.icloud.com
127.0.0.1 p36-availability.icloud.com
127.0.0.1 gateway.icloud.com
127.0.0.1 mobile.pipe.aria.microsoft.com
127.0.0.1 g.live.com
127.0.0.1 gsas.apple.com
127.0.0.1 metrics.icloud.com
127.0.0.1 aidc.apple.com
127.0.0.1 safebrowsing.googleapis.com
127.0.0.1 api-glb-nyc.smoot.apple.com
127.0.0.1 lcdn-locator.apple.com
127.0.0.1 gspe35-ssl.ls.apple.com
127.0.0.1 init-kt.apple.com
127.0.0.1 swscan.apple.com
127.0.0.1 init.itunes.apple.com
127.0.0.1 itunes.apple.com
127.0.0.1 push.apple.com
127.0.0.1 mesu.apple.com
127.0.0.1 gspe1-ssl.ls.apple.com
127.0.0.1 api.apple-cloudkit.com
127.0.0.1 init.ess.apple.com
127.0.0.1 static.ess.apple.com
127.0.0.1 api.smoot.apple.com
127.0.0.1 api-glb-ash.smoot.apple.com
127.0.0.1 gateway.icloud.com
127.0.0.1 setup.icloud.com
127.0.0.1 p36-availability.icloud.com
127.0.0.1 configuration.apple.com
127.0.0.1 cds.apple.com
127.0.0.1 help.apple.com
127.0.0.1 gsa.apple.com
127.0.0.1 gs-loc.apple.com
127.0.0.1 p36-fmfmobile.icloud.com
127.0.0.1 cf.iadsdk.apple.com
127.0.0.1 partiality.itunes.apple.com
Hit "ESC" on your keyboard then ":wq" keys on your keyboard and finally "ENTER" to save the file exiting vim.
Workstation Setup
With your host machine nice and secure, it's time to setup a workstation OS. Everyone reading this likely knows about the importance of virtual machines, so I'll skip over that. There are two options here, one for above-board legal actions (what I always use) and one for our research purposes - as close to bullet-proof as we can get.
Casual Setup
This is for a daily drive, it's what I use. I.E. Something that's fine to use when you're completely above board and legal, connecting from your home network. This is from a Windows Host.
Downloads
Download all of the following for your host OS platform:
VM Disk Drive Setup
You need an encrypted drive to write all the virtual disk's to - don't put this on your host machine's root HDD next to your host OS. I have an extra SSD I dropped into my machine, but it doesn't really matter as long as it's encrypted. I'm not going to go through how to do this, just that:
- For drives, use Bitlocker
- For usb's, use veracrypt
Setup Whonix Gateway
- Start VirtualBox
- Start importing the Whonix CLI ova (Double-click it)
- Ensure you've selected your encrypted drive as the machine base folder.
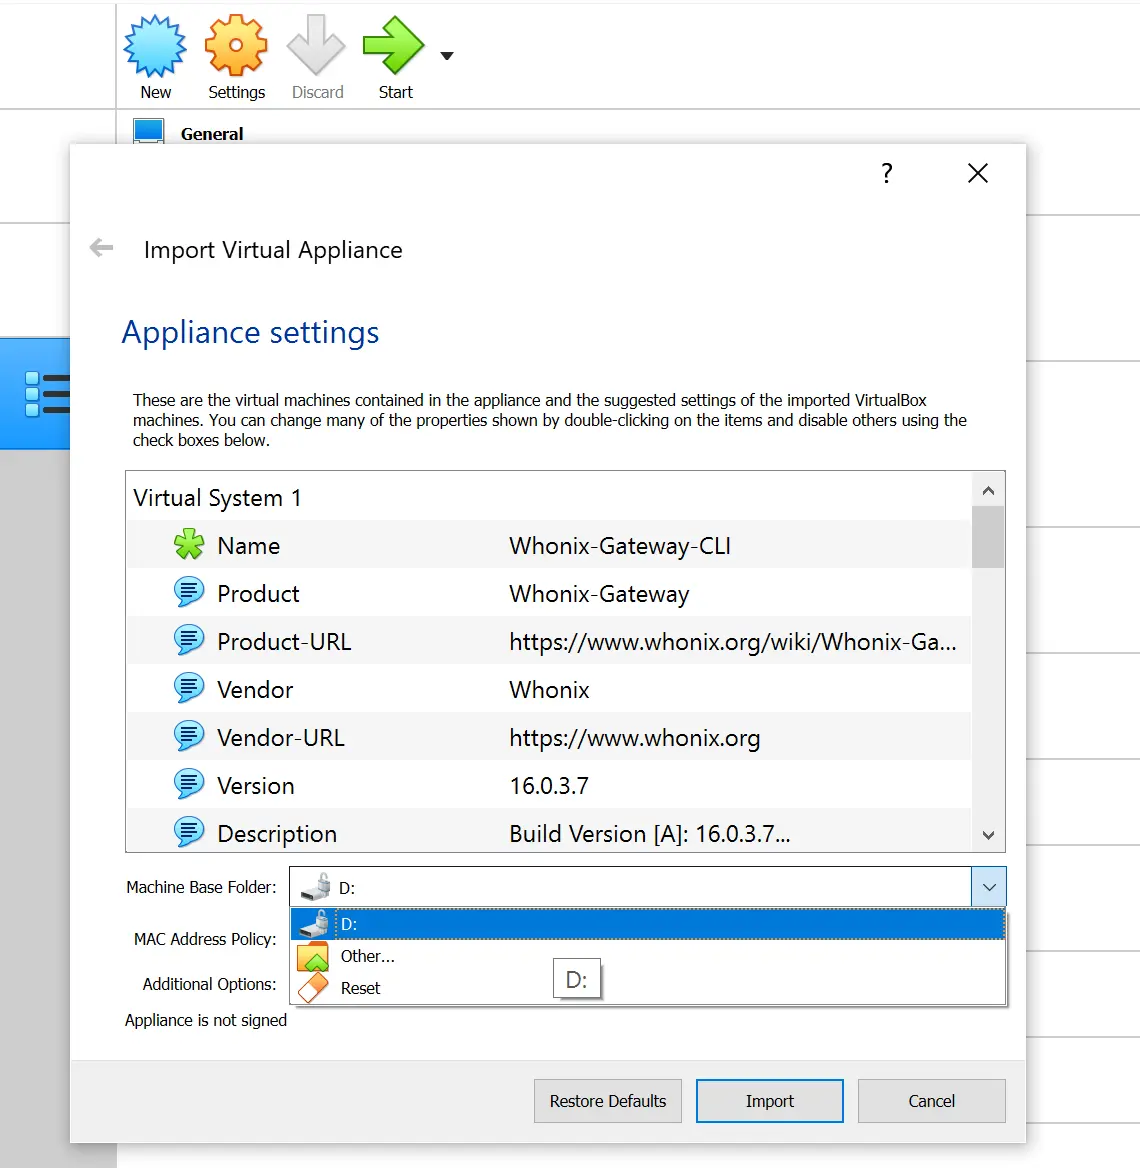
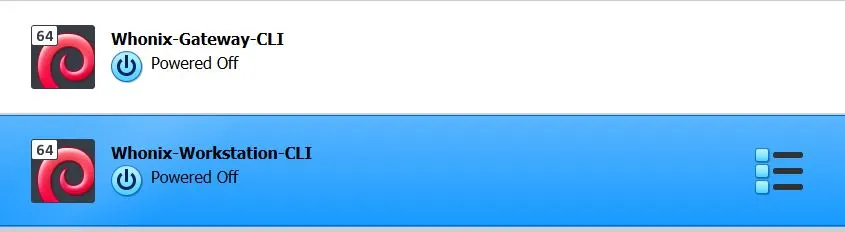
- Import both templates
- Delete the workstation import (Delete all files)
- Boot the gateway. After everything is loaded, you see this prompt:
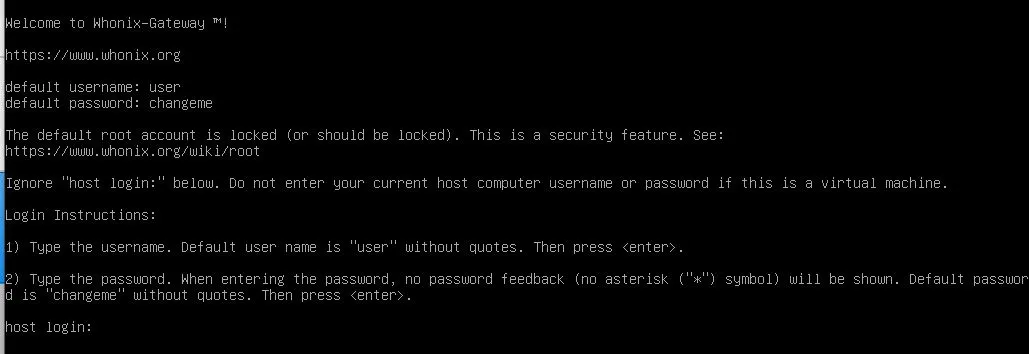
- Login with
userchangemeand let everything load up. - State that you understand throughout the menu's that come up.
- Double-check that you're connected to your VPN on your Host OS
- Unless you need to do otherwise, select the first option to just connect to Tor. Continue through the menu until the interactive session is dropped.
- When it's finished booting, the screen will look like this:
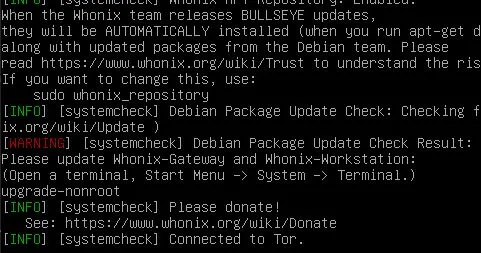
- Hit enter to get a prompt and execute
upgrade-nonroot. It'll take a while before it completes. When it's done you'll be dropped back to a user prompt. - Change the default password. Use a generator somewhere, make it insanely long and full of special characters.
sudo passwd user
... type and confirm password...
- Minimize the gateway and just let it run. Remember to always boot this before your Workstation OS.
Setup Parrot
- Import the Parrot virtual Appliance
- Like the gateway, ensure you're placing the virtual disk on your encrypted drive
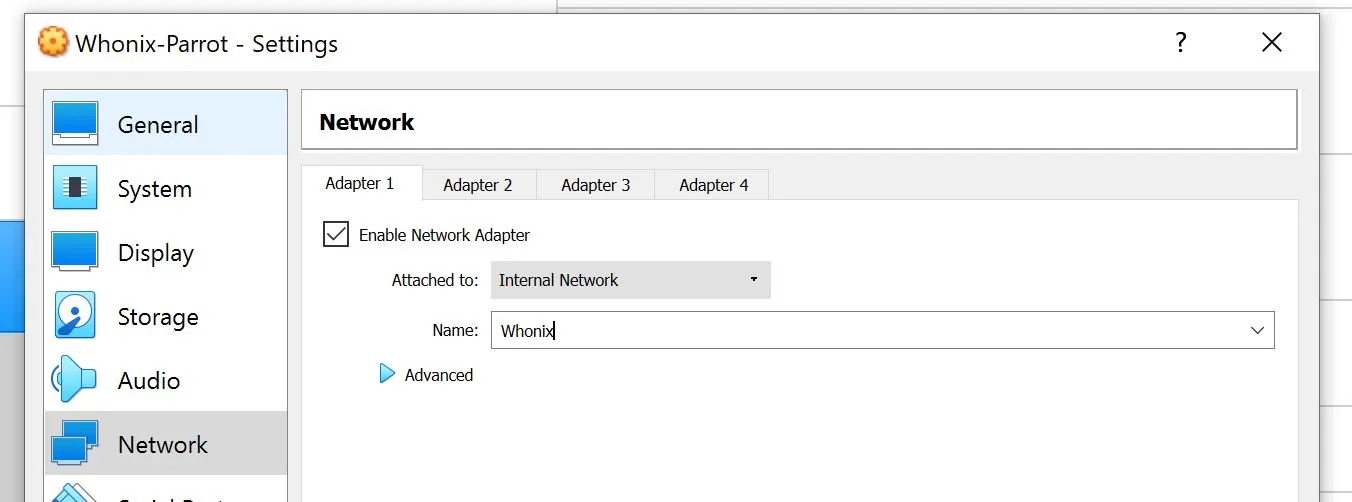
- Now before booting, click settings and go into network settings. Change from NAT -> Internal Network and ensure it selects Whonix as the network.
- Boot the VM (Note you may need to change your graphics controller to
VboxVGA) - Set zone to UTC (Default password is
toor)
timedatectl set-timezone UTC
- Change default password
- Setup network interface
vim /etc/network/interfaces
... add ...
auto eth0
iface eth0 inet static
address 10.152.152.13
netmask 255.255.192.0
gateway 10.152.152.10
Add nameserver to /etc/resolvconf/resolv.conf.d/base
echo "nameserver 10.152.152.10" > /etc/resolvconf/resolv.conf.d/base
Regenerate resolve.conf
resolvconf -u
Ensure it won't get replaced at reboot...